A guide to manipulating HTTP with Charles Proxy
Charles Proxy is exactly what its name implies: a proxy. This proxy is special, however, as it's specifically aimed at giving functionality that developers will need.
It allows you to view, change, and replay the traffic that passes through, and can handle SSL. Charles isn't free, but at $50 (at the time of writing) for a license, it reaps returns from day one. This article will show you how to start using Charles and covers techniques that will help you work with your web and mobile applications – basically anything that works over HTTP.
Getting set up
You can download Charles Proxy from the project website: http://www.charlesproxy.com/. Under the 'Documentation' section you will find instructions for installing the tool onto whichever platform you use (Charles supports Windows, Mac and Linux).
Firefox extension
Charles offers a Firefox extension from its download page that makes it very easy to start using your web applications with Charles immediately. Once you have the extension installed, simply run Charles and then enable the extension from the Tools menu in Firefox. When a web request is made in Firefox, the HTTP traffic involved is routed through Charles. This is a great way to get started and is the approach used to generate the first few examples in this article.
Inspecting traffic in Charles
Charles isn't the only option for inspecting traffic, but it is at least as fully featured as using alternatives such as browser plugins such as REST Console or LiveHTTPHeaders, or capturing traffic using a tcpdump and/or Wireshark. Charles understands more types of traffic than just what comes through a browser, and has better support for storing, sharing, altering and repeating requests than Wireshark.
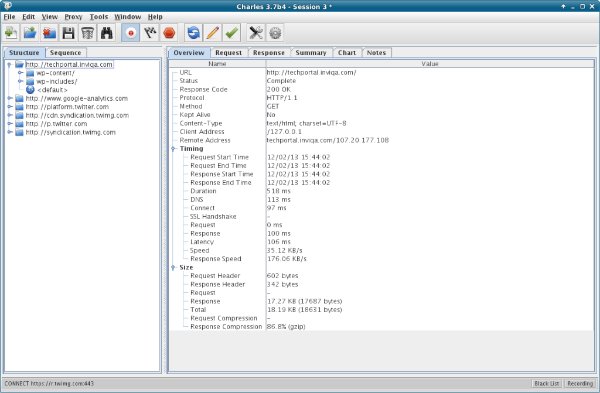
By default in Charles, when you start to capture traffic you'll be looking at the 'Structure' tab, which shows all the requests that have been made, organised by URL. Each folder has a domain, then there are subfolders for each element of the path. The view ends up looking something like:
A more linear way to look at the traffic is to use the 'Sequence' tab, which will show something like this:
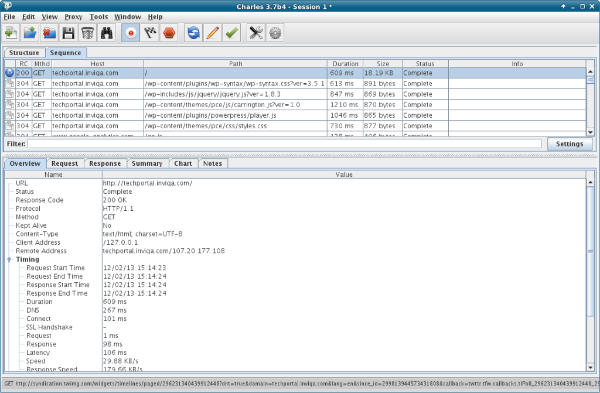
Where to look next depends entirely what you're looking for. The filter box (below the sequence of requests and above the detail section) is very smart, including the ability to configure it to use a regular expression in its search, and will search all the fields shown in the grid. This allows you to filter down the results to just requests with a given response or using a particular verb, or to a particular domain or subdomain.
Once you have identified the request you want to see, check out the tabs in the bottom half of the screen. These typically show the following options:
- Overview: Some summary information about the request and response formats, sizes, time taken, and so on. This can be useful when comparing similar requests.
- Request: Full, detailed information about the request, headers, data sent. Look at the different aspects using the tabs along the bottom of the window.
- Response: Much like the request tab, the response tab has some very nice feaures, in particular its ability to nicely represent data formats such as JSON which can be viewed raw, pretty-printed, or parsed into a structure you can drill down into.
- Summary: Shows all the requests that were made as a result of this request, such as loading other assets to display the page, plus information about the overall size and time of these. Mostly useful when requesting a root page which loads in other elements such as images.
- Chart: Also mostly useful when requesting a page that loads other elements, this gives a timing diagram of things arriving as shown in the figure below:

Armed with this information, you can take a good look at what's taking the time in your application, which pages are pulling in which other pages, and so on. Once you have identified where a problem exists, we can use the following techniques to further diagnose or observe it.
Replay a request
Charles offers the ability to repeat a specific request as many times as you want to. Either right-click on the request to see the options and choose 'repeat', or press the blue circular arrows button on the toolbar to repeat the request. As a debugging tool, this is much nicer than having to fill in the same web form lots of times, or otherwise follow a tricky, multi-step process to replicate a bug.
The right-click menu also offers the ability to 'repeat advanced', which allows the same request to be made to the server multiple times, including the option to specify the concurrency. If you are seeing weirdness under load or you suspect a race condition, then this feature is your friend!
Sharing requests
It's possible to import and export sessions with Charles, in HAR (HTTP ARchive) format, which is supported by other tools as well. This is superbly handy when one developer is seeing a problem and wants to show another one what's happening without the aforementioned tricky process to reproduce the bug. Simply export your session from Charles and add it as an attachment in the bug tracker; whether it is you or someone else that picks this up, it makes it very easy to replicate the problem and be able to begin working on a fix.
Throttling requests
This is a really good use of a local proxy: to throttle the traffic going through your browser in order to simulate a particular setup or network speed. For websites where it is likely that the user is either using a mobile phone or is connected via a mobile data connection, this gives us, as developers, insight into how the user experience will be in that scenario.
Charles offers a few options for speed restrictions to simulate different kinds of network connection, shown in the screenshot below:
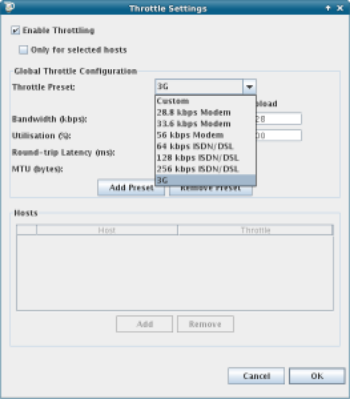
It is also possible to limit throttling to just a particular set of hosts, so if for example you know that one particular third party may provide slow connection speeds in some situations, then you can narrow that down using these settings.
Throttling is a very important step in testing mobile applications, especially when working with either mobile sites or with app simulators, since it gives a more realistic sense of the user experience. I lead an open source project (http://joind.in) which is used mostly at conferences, and conference wifi is usually fairly awful – so I throttle down to old modem speeds to give myself a sense of experience when developing that site.
Another feature of Charles which is relevant to this area of development is that it can disable caching. This enables you to reproduce the experience that a new visitor to your site will see. To achieve this, Charles changes the headers in the HTTP traffic, a feature that we can take direct advantage of ourselves.
Changing requests and responses
Sometimes, the request and responses that are made by an application aren't exactly what we need them to be. This can be useful for playing tricks such as redirecting traffic from a mobile app which assumes a particular URL for its API backend, or injecting a specific header to be able to trace your request in the server logs or to enable debugging for requests coming in via this route.
The rewrite functionality can be applied to all requests, or just a subset, and multiple rewrites can be configured at one time. They are encapsulated into rule sets, so you can save the settings of these, and then enable/disable them at will. For the rewrites themselves, there are yet more choices; here is the input dialog for creating a rule, to give you an idea of what's possible:
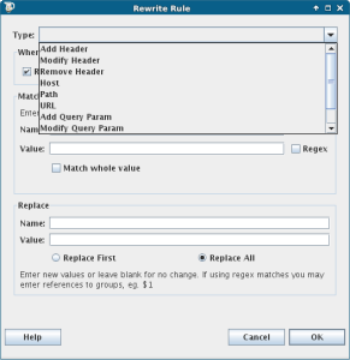
As you can see, the options here are endless. There are any number of reasons why you might need to add things, but these are my most common use cases:
- Injecting extra headers, either so that I can track a journey through the site because the additional information gets added to a log file, or to enable additional debugging.
- Injecting response headers to see how a client would react on receiving these from a server. HTTP supports the use of custom headers, so in theory you can use any header you like so long as your server knows how to understand it, and the RFC (see RFC 2616) recommends picking a prefix. In practice, it's common to use X- as the prefix for these "invented" headers.
- Modifying headers to alter a User-Agent header to chase down a particular bug.
- Setting Host headers – easily the most-used, mostly when using other machines or devices on a network to hit a local development virtual host with a different domain name than expected by the application (more on this in the next section showing how I develop with mobile devices against my local development machine via Charles).
- Adding a rule to do a find-and-replace on the body of a request or response is also very useful at times, for example to rewrite links.
These are very useful tools and the biggest advantage is that you don't need to recompile or reconfigure either the client or server to make these changes; Charles can intercept the traffic and make the changes on the fly. When developing a mobile app, where you might want to change whether it hits live or development copies of the back end API for example, this is a very quick and easy way to do it. It also protects against hardcoding these changes into your application and then finding that they get erroneously committed and deployed.
Mobile debugging and re-routing
Charles can act as a proxy for other devices to route via the machine it runs on, allowing us to observe and operate on traffic to clients other than the Firefox plugin. To get set up is fairly straightforward using the following steps.
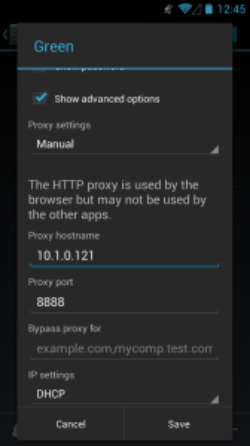
First, check the IP address of your machine, and check or set which port Charles will listen on by looking under Proxy, then Proxy Settings. By default this is 8888, and in this example my machine has the IP 10.1.0.121.
Add either the machine hostname or IP to the device to proxy under the wifi settings for the shared network. I'm using an Android phone as I've been looking at the updated Android app for joind.in, although do be aware that some versions of Android (stock ROMs in the 2.x series, also known as "bug 1273") do not allow you to specify a proxy when adding network settings.
When you try to make a web request from the phone now, Charles will alert you that something is trying to proxy through, and give you the opportunity to allow or deny the access:
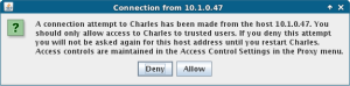
While working with the mobile app, this is a very easy way to observe the traffic being sent and received, and to spot any errors that might be silently ignored or not handled by the application (particularly as my application is in very early stages).
At this point we have the opportunity to perform all of the filtering and altering of traffic that were seen earlier when making web requests. In this scenario, sometimes I want to try the mobile app against my local development version of the API. To do this, I have a rewrite that simply routes anything for http://api.joind.in to api.joindin.local. This is in the hosts file on my machine, so it knows that domain is on the local host. Here is the rewrite rule in Charles:
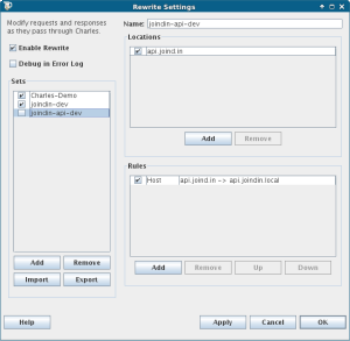
When I tick and untick the 'joindin-api-dev' box, I interrupt traffic to the live API, and instead send it to my local version of the API, which contains sample data and possibly local modifications. This is such a powerful feature when doing mobile development, because the data sources can be swapped without any need to restart the app, and certainly without changing or rebuilding it. This tactic is useful both when the app can't be changed, and also when it's simpler to intercept its traffic for testing.
Charles and SSL
In the interests of saving the best feature until last: Charles will also work with SSL traffic. SSL traffic is usually very difficult to debug, by design, because nothing other than the client and the server taking part in the transaction should be be able to see the traffic. An encrypted channel is established and everything is passed over it. So how can Charles intercept it?
What actually happens is that Charles executes a classic 'man in the middle' attack. The encrypted channel gets set up between Charles and the remote server using the 'real' SSL certificate. Charles then uses its own certificate to sign a second encrypted channel between Charles and the browser or client.
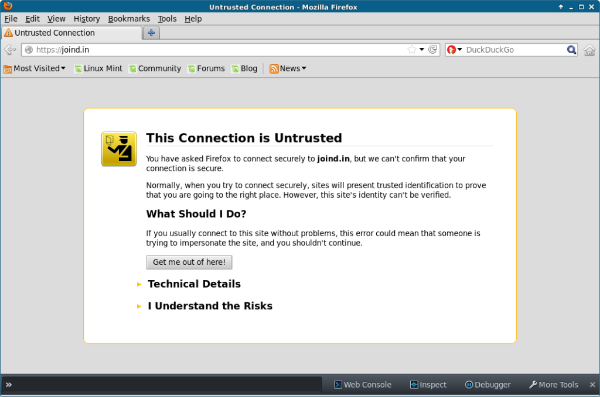
In order to protect you against man-in-the-middle attacks, your browser won't accept a certificate that isn't from a trusted Certificate Authority unless you specifically grant permission for it. This is fairly common on development servers where it doesn't make sense to pay for an official SSL certificate, so you may have seen these types of untrusted certificate warnings in such scenarios.
To use this feature, first of all you will need to enable Charles to proxy SSL traffic, by ticking the box in the Proxy Settings screen. You should also specify which domains should have their SSL traffic proxied.
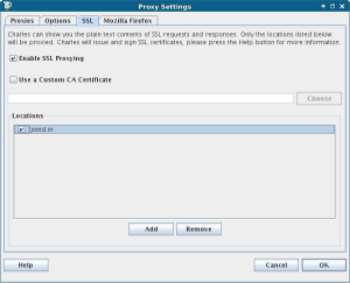
As we already mentioned, Charles then intercepts the traffic, using the remote site's correct SSL certificate for the connection between there and Charles, then an untrusted one between Charles and the client. This means that when you enable this in Charles, your browser will tell you that there isn't a valid SSL certificate for the remote site.
Confirm the security exception and you can now proceed as normal with all the features mentioned in the earlier sections of this post. Charles isn't the only tool to offer this functionality, but it's one of the easiest to get up and running with. When testing or debugging for SSL setups, this is a very valuable addition to the toolbox, and one that I hope you'll find useful moving forward.
Charles, web debugging Proxy
This article aimed to give you an overview of some of the most useful aspects of Charles for both web and mobile developers, as well as some pointers on how to actually apply the techniques covered here. All the requests, settings and configuration in Charles can be exported and shared, which is a huge help when using this tool across a team.
Other good products are available and you may also choose to make use of these. We also use Curl for being able to make many different kinds of web requests and to easily share them by pasting the commands into the bug trackers. Another alternative if you only need to inspect (non-SSL) traffic is Wireshark, as we mentioned earlier in the article. Both Curl and Wireshark are free, multi-platform tools.
Charles' tag line 'web debugging proxy' is pretty accurate, making it indispensable in many situations. If you've got a Charles tip to share, or want to tell us how you make use of the techniques shown here, please do let us know!